Showing posts with label Recipe. Show all posts

Sunday, May 22, 2011

Corn Salad = Sunshine and all things good

Okay, you may think that title is a little extreme for corn salad, but I assure you it is not. I mean look at this:
 
Corn Salad
Photo courtesy of http://www.dashrecipes.com/

Look at that bowl of sunshine. Bright yellow corn. Fresh basil and chives. If this doesn't get you in the mood for summer cookouts I seriously think we need to break up.

I had to resort to using a photograph for this recipe from the website because:

  1. the huz doesn't eat fresh tomatoes, so picture this salad sans the pop of red color - B-O-R-I-N-G (but only in appearance, not in taste - I substituted sundried tomatoes instead)
  2. we ate the salad so fast I really didn't have an opportunity to take a picture...we are pigs I tell ya'
 I have to say the dressing for this salad is really the star. I know I will make this salad many times this summer, but I'm even more excited to try the dressing with some other flavor combinations.

We enjoyed this salad with a nice piece of roasted salmon, and steamed green beans. Delish!

Consider my discovery my personal gift to you, this beautiful Spring day.

Corn Salad
Yields: 6 servings (if you are lucky)

Ingredients:
2 cups water, plus 1 Tbsp
¾ tsp salt, divided
1 cup quick-cooking barley
2 cups corn kernels (4 ears)
1/3 cup olive oil
1/3 cup chopped fresh basil
3 Tbsp chopped fresh chives
1½ Tbsp red-wine vinegar
¼ tsp sugar
¼ tsp black pepper
3 Belgian endives, trimmed and sliced crosswise to ½ inch thick
Halved cherry tomatoes for garnish


1. Bring 2 cups water and ¼ tsp salt to boil in a saucepan. Stir in barley; reduce heat and simmer, covered, 10 minutes. Remove from heat. Let stand 5 minutes.

2. Cook corn in a large pot of boiling water, 1 minute. Drain, rinse in cold water, drain again, and pat dry. Place in a large bowl.

3. In a blender, combine oil, basil, chives, vinegar, sugar, ½ tsp salt, pepper, and 1 Tbsp water. Drain barley; add to corn. Stir in endives and dressing. Top with tomatoes.


Source: http://www.dashrecipes.com/ Gourmet Magazine

Friday, May 20, 2011

Rigatoni with Roasted Sausage and Broccoli

Rigatoni with Roasted Sausage

So I tease you with telling you how good this dinner was on Sunday night, then I completely forget to post the recipe - or take a picture for that matter. I pretty much suck, don't I?

I can't blame the mini vaca, or the bit of sunshine streaming through my windows. I've just been lazy when it comes to the computer. You see I'm on a computer much of my work day, and the last thing I want to do is look at a screen when I get home (unless that screen is showing "Top Chef Masters" or "Yard Crashers," then I'm totally hooked).

But, I really do want you to have this recipe because it was tasty, and quick, and I made it vegetarian...oh, and the huz loved it. If it passes the huz test you know it's a winner (he is a very finicky eater).

I followed this recipe to the letter EXCEPT I did use my tried and true Tofurky Italian Sausage. Oh, yeah, and I added a half cup of chopped walnuts too. The walnuts gave a great crunch and texture that was a little unexpected - plus walnuts are so good for you.

Recipes like this prove that there is no excuse not to have a good, hot, homecooked meal any night of the week.

Rigatoni with Roasted Sausage and Broccoli
Serves 4

Ingredients

  • 2 tablespoons unsalted butter (in reading this recipe I realize I didn't use the butter - I didn't miss it)
  • 1/4 cup grated Parmesan (1 ounce)
  1. Heat oven to 400° F. Cook the pasta according to the package directions. Reserve ¾ cup of the cooking water. Drain the pasta and return it to the pot.
  2. Meanwhile, on a rimmed baking sheet, toss the broccoli and onion with the oil, ½ teaspoon salt, and ¼ teaspoon pepper. Nestle the sausage among the vegetables.
  3. Roast, tossing once, until the broccoli is tender and the sausage is cooked through, 18 to 20 minutes.
  4. Toss the pasta with the broccoli and sausage mixture, butter, and ½ cup of the reserved cooking water (add more if the pasta seems dry).
  5. Sprinkle the pasta with Parmesan before serving.
Source: Real Simple Magazine

Sunday, April 24, 2011

Tortellini Soup

Last week I made tortellini soup and completely forgot to write about it, let alone share the recipe. I have had this recipe for many years. To be honest I'm not sure where it came from, BUT it is one of those rarities that both the huz and I love. Sometimes he even requests it, and he's not even a big soup fan. Or pasta fan. Or tomato fan. So that says a lot for this recipe.

I have to tell you it is super easy and super fast. The key is to have all of your ingredients prepped before you even start cooking because it goes together that quickly.

On a completely separate note - HAPPY EASTER!  As I type I am patiently waiting for my in-laws arrival (we are hosting Easter dinner - woo hoo), so this is really helping me take the edge off. Because I have been focused on Easter that past two days I haven't given my weekly menu a ton of thought. I can tell you it will have a Mexican/Spanish theme though, and I'm fairly confident I have the menu planned out.  I can tell you with 75% certainty that tomorrow night we will be having Vegetarian Tortilla Soup and Quesadillas. I'm pretty sure.

Now back to Tortellini Soup. Enjoy!

Makes 4 - 6 servings

1 tablespoon butter
4 cloves of garlic, minced
2 - 14 1/2 ounce can vegetable broth (or chicken broth)
1 - 9 ounce package cheese tortellini
1/4 cup grated Parmesan + additional for garnish
Salt and Pepper
1 - 14 1/2 ounce can petite dice tomatoes
1/2 bunch or package of spinach, stemmed and julienne sliced
1 teaspoon dried basil

1. Melt butter in heavy saucepan over medium heat. Add garlic and saute 2 minutes.
2. Stir in broth and tortellini. Bring to a boil and reduce heat.  Stir in 1/4 cup Parmesan. Season with salt and pepper. Simmer until tortellini are just tender, about 5 minutes.
3. Stir tomatoes, spinach, and basil into soup. Simmer 2 minutes.
4. Serve, topping with additional Parmesan cheese, if desired.


Bowl of Yum!

Friday, April 8, 2011

Quinoa Salad???

Greetings and Salutations!!!  The huz and I are enjoying some fine rest and relaxation - and much of that I can attribute to my amazing dinner menu this week. Every meal  has been a winner     and it has been so nice cooking and enjoying wonderful food - prepared by me, of course!

Case in point:  Last night I prepared what I thought was a quinoa salad recipe, but really it was a quinoa side dish. Truth be told, I ate it as a salad today, so I think it goes both ways.  The huz gobbled it up along side his juicy hamburger, on three cheese sourdough bread (I even caught his nibbling out of the pan when we were doing the dishes). Not only healthy, and tasty, but huz approved for sure.

Salad or Sidedish?  It's delish either way
Quinoa Salad???

1 1/2 cups cooked quinoa
1/2 cups diced red onion
1/2 cup diced sundried tomotoes (yes, I'm still working on polishing off a jar)
3 cups slivered kale
1 cup frozen corn kernels, thawed
1/4 cup chopped flat leaf parsley
1/2 lemon, juiced
salt and pepper

1.  Saute onion in a large non-stick skillet, over medium heat, two minutes.
2.  Add kale, and saute another minute.
3. Stir in quinoa, corn, and sundried tomatoes. Heat through.
4. Turn off burner and stir in lemon juice, parsley and salt and pepper to taste.
5. Eat!

Easy, right? For lunch today I added some sliced avocado and cooked shrimp meat. Delish.

Have a great Friday, and an even better Saturday!!!

Saturday, April 2, 2011

Cauliflower and Chickpea Stew with Couscous

Thursday night I made the best dinner. I think the reason I like this so much is that it is just clean, good food. Nothing fancy. No special ingredients. One pot....one plate...done. The only thing I had to buy was the cauliflower, otherwise all of the other ingredients are pretty standard in my pantry and fridge.

For the carnivores out there, I could easily see adding some rotisserie chicken.  But really? Why ruin a good thing.

This recipe came from the December 2010 Real Simple, but I did modify it, so I am writing the modified version.


Cauliflower and Chickpea Stew with Couscous
Yields 4 generous servings (I actually had some for lunch today, and will probably be having some for lunch tomorrow)

1 tablespoon olive oil
1 medium onion, chopped
1 1/2 teaspoons ground cumin
1/2 teaspoon ground ginger
Salt and Pepper
1 - 14 oz can diced tomatoes
1 - 15 oz can chickpeas, drained and rinsed
1 head cauliflower, cored and cut into pieces
1/2 cup raisins (golden or regular)
1 - 5 oz package baby spinach, chopped
1 cup couscous

  1. Heat the oil in a large pot (I used my dutch oven), over medium heat. Add the onion and saute, stirring occasionally until it begins to soften (about 5 minutes). 
  2. Add the cumin, ginger, 1/2 teaspoon salt, and 1/4 teaspoon pepper.  Cook, stirring until fragrant (about a minute).
  3. Add the tomatoes, and their liquid, chickpeas, cauliflower, raisins, and 1 1/2 cups of water.  Bring to a boil.
  4. Reduce heat and simmer, covered, stirring occasionally, until the vegetables are tender (about 15 - 20 minutes)*.
  5. Add the spinach, and cook an additional 1 - 2 minutes.
  6. Place the couscous in a large bowl. Add 1 cup of boiling water. Cover and let sit for 5 minutes.  Fluff with a fork, and serve with the stew.
* Note: I cut my cauliflower into fairly large pieces, and as the stew simmered I broke them down with a wooden spoon into more bite friendly florets. I only did this because cauliflower is super messy to cut up and this worked really well.

For added protein Real Simple did recommended sprinkling with sliced almonds.  I think I would definitely give this a try - especially toasted, sliced almonds. I think the crunch would add great texture. Don't be afraid to kick up this recipe with a few dashes of chili sauce as well.  Bon apetit!

Tuesday, March 22, 2011

Orzo Salad

Saturday I was at our local grocery store, picking up some pastrami for the huz, and drooling over the deli case full of delectable salads and gourmet cheeses.  One salad in particular caught my eye - Orzo with Artichoke hearts and Olives. Now olives and artichoke hearts are two ingredients the huz would totally pass on, but not me. I love anything pickled – beets, artichoke hearts, olives, and of course pickles, sweet and dill. Seeing this pasta salad got my wheels turning, and the saliva glands flowing.  I had to make an orzo salad this week!
One of my favorite combinations is basil, tomatoes, and mozzarella. These ingredients make up the classic Caprese salad, or what you would find on a truly Italian Margherita pizza. I decided to do a play on this concept.  One problem: the huz hates fresh tomatoes. I know. You’re scratching your head right now thinking, “what the h-e-double hockey sticks is she doing with this guy?”  Oh, despite his aversion to most of the foods I love he’s pretty awesome. He’s just a little quirky about certain foods and I have become very adept at working around his likes and dislikes. Personally, I’d probably eat a shoe if it was fried (or pickled J).
Case in point – sundried tomatoes. The huz loves them. Sundried tomatoes pack a powerful punch in a very small bite. They are super flavorful and add a lot of depth and dimension to any recipe. 
This was the gist of my Orzo Salad creation:
Ingredients:
½ pound orzo pasta, cooked according to package directions, drained, and rinsed under cool water
½ package fresh spinach, cut into julienned strips (if it was summer I would totally use fresh basil)
¼ cup sundried tomatoes, diced
¼ cup Havarti cheese, diced (I had Havarti, otherwise I probably would have used fresh mozzarella)
¼ cup balsamic vinaigrette (I make my own with vinegar, olive oil, dried basil, salt/pepper)
Directions: 
Toss everything together in a bowl. Eat.

I think this is the beginning of a beautiful love affair


That’s it.
Seriously. 
I can’t even begin to tell you how great this salad was. Between the creamy Havarti, salty/sweet tomatoes, and fresh spinach, I was in heaven. 
See what happens when you “play” in the kitchen? You never know when inspiration will strike, and sometimes it’s a home run!!!
I’m two for two this week.

Monday, March 21, 2011

Potatoes Au Gratin

Do you ever have one of those Sundays where you feel utterly unrushed and leisurely? If not, I pity you.  Yesterday was one of those days for me. The only thing I HAD to do was go to the grocery store. Other than that the day was mine.

The huz and I had a relaxing morning, reading the paper, drinking our coffee. I was able to work on our grocery list, and we got to the store and back within 45 minutes. Awesome. I swear this blog has simplified my grocery list beyond words - saving me time and money.

As the day progressed and the rain really kicked in we decided to rent a DVD, and curl up on the sofa for a couple hours (if you were curious we rented "Wallstreet" - very good movie, although I have to admit I was a little lost the first half. I don't see "stock broker," "venture capitalist," or "federal reserve banker" ever being added to my resume.  It's a whole other world).

With the weather and the pace of the day my oven was just screaming at me, "Shawn....use me....bake something." At the same time I had a huge bag of potatoes in my pantry calling out to me, "slice me....cover me in cheese...bake me!"  How could I ignore this chorus in my kitchen?

I couldn't. Potatoes Au Gratin it is.

Now, we are not big potato eaters in our house. It's probably the huz's least favorite starch. I, however, love them. With this recipe, I think I converted him. I have a feeling this may show up on my menu next week as well.


Who doesn't love potatoes and cheese????
Potatoes Au Gratin

Yields 3 - 4 servings

1/2 cup chopped onion
4 medium baking potatoes, peeled and thinly sliced
salt and pepper
2/3 cup shredded Cheddar Cheese
1/4 cup shredded Parmesan
1 cup vegetable broth
1/2 cup skim milk
2 tablespoons flour

1. Saute onion in a nonstick skillet, coated with cooking spray, over medium heat until softened.
2. Spray a 8 x 8 casserole dish with cooking spray. Arrange one third of the potato slices, in dish. Sprinkle with salt and pepper. Top with half of the sauteed onions, and half the cheddar and Parmesan cheeses.
3.  Repeat layers, ending with remaining potato slices.
4.  Bring broth and milk to a boil over low heat. Whisk in flour, and cook for two minutes. Pour over potato mixture.
5.  Bake in a 425 degree oven for 50 minutes, or until tender.  Let stand for 10 minutes before serving.
No complaints from the huz

Thursday, March 17, 2011

Spanish Rice Bake

Happy St. Patrick's Day! I have to say, I am not 100% sure where this week went. How is it possible that I am writing about Monday night's dinner, on Thursday night? St. Patrick's Day no less?

The older I get, the faster time seems to elude me. It's a horrible thing that no one warns you about. All the focus is on covering the grays, and making those laugh lines disappear. Smoke screens I tell ya'. Time. Time is of the essence!  Someone needs to come up with a miracle cream to bring back the past couple days. Now THAT would be the fountain of youth.

Back to Monday.....since it was soooooooooooo long ago. All I can tell you is dinner was awesome. There's no other word. Even the huz would agree. It was so good, all I can really say is you have to cook it for yourself to truly appreciate it. I can whip out the thesaurus and try to come up with a bunch of flowery words to describe just how good dinner was, and it wouldn't do it justice. It's like trying take a picture of sunset. It's never the same as being there.


Not a bad sunset afterall

Vegetarian Spanish Rice Bake
Yields 6 servings

1 package Morningstar Farms crumbles or other vegetarian "ground beef"
1 tablespoon olive oil
1/2 cup finely chopped onion
1/4 cup chopped green bell pepper
1 (14.5 ounce) can canned petite diced tomatoes
1 cup water
3/4 cup uncooked long grain rice
2 tablespoons chile sauce
1 teaspoon salt
1 teaspoon brown sugar
1/2 teaspoon ground cumin
1/2 teaspoon Worcestershire sauce
1 pinch ground black pepper
1/2 cup shredded Cheddar, Monterey Jack or Pepperjack cheese
2 tablespoons chopped fresh cilantro

Directions

  1. Preheat oven to 375 degrees.
  2. In a heavy skillet heat 1 tablespoon olive oil over medium-high heat.  Saute the onion and green bell pepper until softened.
  3. Add the Morningstar Farms crumbles and cook until they are heated through - 5 minutes.
  4. Stir in tomatoes, water, rice, chile sauce, salt, brown sugar, cumin, Worcestershire sauce and ground black pepper.
  5. Le simmer for about 30 minutes, stirring occasionally.
  6. Sprinkle with the shredded Cheddar cheese and bake at 375 degrees for 10 to 15 minutes, or until cheese is melted and bubbly. Garnish with chopped fresh cilantro.


Serve with a fabulous salad (like mine) or steamed veggies of your choice.

Tuesday, March 15, 2011

Kale and White Bean Soup

As a person who eats a primarily vegetarian diet, there is no shortage of fiber in my life.  I eat a lot of dark leafy greens, beans, fruits, vegetables, and whole grains. It's just a given when you cut red meat, pork, and chicken out of your life. I always kind of laugh when I see fiber commercials because it really baffles me how fiber can be lacking in one's diet, because fiber is almost it's own food group in my world.

Case in point: I think towards the end of last week I was on fiber overload. Without being too specific lets just say I probably could have had a colonoscopy, no problem.
Call Dr. McDreamy.  I needed carbs, stat!  Carbs would be the only cure.

Because we were going to be out and about quite a bit on Saturday, I knew the huz and I would be dining out much of the day. Mind you I had oatmeal for breakfast (old habits die hard), but made up for it at lunch when I had scrambled eggs, crispy cottage potatoes, and a big, fat buttery biscuit. Yes, that was my lunch. No, it was not a second breakfast.  I was in carb heaven.

Saturday night, we hit Taco del Mar, on our drive home, and picked up a couple burritos and chips with queso. To quote my eleven year old niece, "OMG." What a good burrito (and yes, Nicole, I did nuke it when I got home so it would be piping hot). Of course, my burrito was beans and veggies on a wheat tortilla, but it was fast food, so it had to be carb heavy somehow. You know they hide the carbs in there somewhere. Oh I know, the plate of tortilla chips and queso was the carb balance I was looking for.

Needless to say by Sunday, I was ready for my usual fare. Those carbs work fast!  I knew just the perfect meal - Kale and White Bean Soup. The name says it all. Creamy cannelini beans, chewy pasta, hearty kale - I love being a vegetarian. I love soup. You should too.


Oh, and I almost forgot, I had a bit of pizza dough left over from Thurdsay night, and got a wild hair (or is it hare) to make dinner rolls. Basically I just rolled the dough into balls, put them in a muffin pan, drizzled a little olive oil on them and baked them for 15 - 20 minutes or so, at 425 degrees. While they were still in the pan, I put a little butter, salt, and fresh parsley on top.  That's how we roll in our house.  Peace out.

Keep rolling, rolling, rolling....


Kale and White Bean Soup

Serves 8| Hands-On Time: 25m | Total Time: 30m

Directions

  1. Heat the oil in a large pot over medium-high heat.
  2. Add the garlic, celery, onion, 1 ½ teaspoons salt, and ½ teaspoon pepper and cook, stirring occasionally, until tender, 4 to 6 minutes.
  3. Add the beans, pasta, kale, rosemary, 8 cups water, and Parmesan rind (if using). Cover and bring to a boil.
  4. Reduce heat and simmer until the pasta and kale are tender, 4 to 5 minutes.
  5. Remove the Parmesan rind. Stir in the lemon juice and sprinkle with the shaved Parmesan before serving. Serve with the bread.
Courtesy of Real Simple Magazine - Sara Quessenberry,  January 2010

Thursday, March 10, 2011

Thai Chicken/Tofu Wraps

Tuesday night we had Thai Chicken/Tofu Wraps. Really what makes this recipe is the sauce. You could pretty much put anything in a wrap and eat it, as long as you have this sauce. I have shared this recipe with several people and it all boils down to the sauce. Are you hearing me? It's the sauce.

Because it's all about the sauce (I think I hear a drinking game coming out of this post), I'm not even going to bother you with a "wrap recipe."  I will tell you that I used these fabulous tortillas though.


The funny thing is I could care less that they are "100 calories." Lord knows I love my carbs. I just love these tortillas. I found them by accident when I bought a soft taco size, and right now this is my favorite brand of tortillas. I've had every variety that I can find, and have loved them all.

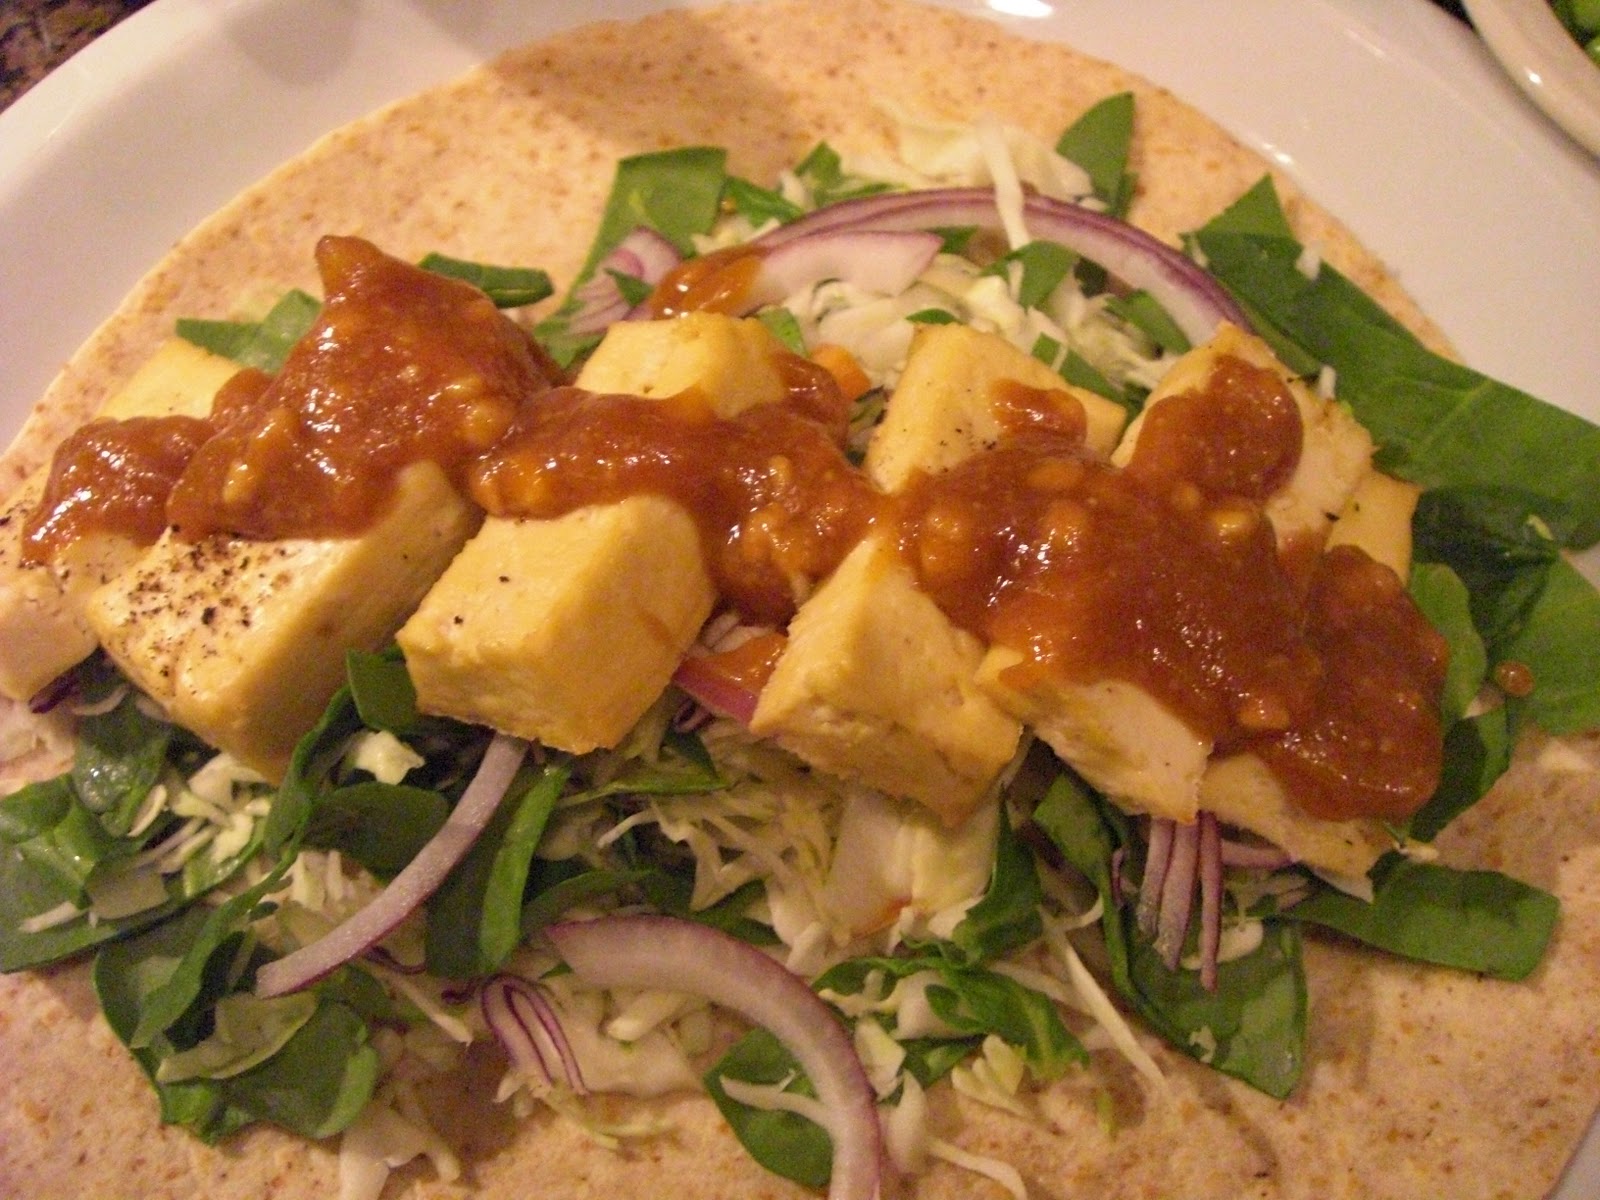
Our wraps essentially boiled down to: warm tortilla, warm chicken/tofu (left over from Sunday night's dinner), equal parts coleslaw mix and spinach, thinly sliced red onion and peanut sauce...oh, and a hit of Sriracha because we love some heat in our house.  Super easy.  Super tasty. I even packed a wrap for my lunch on Wednesday, ate it cold no less, and it was better than anything I could have bought off the street. We had miso soup and shelled edamame on the side, and it was a perfect dinner.

Thai Tofu Wrap

Now that I have sufficiently used the word sauce more times than I can count, here she is. Be warned, once you make this, you are going to make it again, again, and again.

Thai Peanut Sauce
Yields 6 servings

1/4 cup sugar
1/4 cup creamy peanut butter (although I have used chunky as well)
3 tablespoons soy sauce
3 tablespoons water
2 tablespoons cooking oil
1 teaspoon minced garlic

Combine all ingredients in a small saucepan.  Heat until sugar is dissolved, stirring frequently.

That's it. Seriously. It's gonna be the best thing you ever had.

Tuesday, March 8, 2011

Creamy Broccoli Soup

Spring is in the air.  With daffodils blooming, and a 59 degree day, today, I feel that we are on the verge of spring (or perhaps that is my wishful heart hoping that winter is about to be officially put to rest).  Unfortunately one of the innocent victims of the end of winter is soup. October through March are really the prime soup months. Gray skies, rain showers, and shorter days go hand in hand with a steaming bowl of soup.

Nobody in the dead of winter ever says they want to curl up with a cozy blanket, by the fire, and eat a green salad. It's the slow cooked meals -  the house filled with the aroma of some beautiful creation simmering away all day, ready to warm you from the inside out. That is what makes soup the best thing ever. Add a grilled cheese sandwich...and forget about it.

With daylight savings arriving, or returning (not really sure which) on Sunday, I see soup recipes thinning out soon. Luckily, I found a great new recipe that I can't wait to share with you. It comes from Real Simple magazine (February 2011).  If you actually make this soup, you will be AMAZED at how easy, tasty, and truly satisfying it is.

One tip: I used my immersion blender for this. If you do not have an immersion blender, you can use a traditional blender, but I tell you what, immersion blenders are awesome.  Once you go immersion you never go back. 


This is one smooth operator - pun intended :-)

Second tip: I did not have Bagel chips to put on my soup. I figured the Bagel chip was essentially acting as a crouton (texture, salt) for the creamy soup.  Instead, we had Parmesan/garlic pretzel nugget things in our pantry, that I put in a plastic storage bag, and pulverized with my rolling pin. I think they worked really well, so don't be afraid to be resourceful and use what you already have.

Here's the star of our show...

Creamy Broccoli Soup

Serves 4| Hands-On Time: 20m | Total Time: 40m

Ingredients

Directions

  1. Heat the oil in a large saucepan over medium heat. Add the onion and red pepper (if using) and cook, stirring occasionally, until the onion is soft, 4 to 6 minutes.
  2. Add the broth, broccoli, potato, 2 cups water, ½ teaspoon salt, and ¼ teaspoon black pepper to the saucepan and bring to a boil. Reduce heat and simmer, covered, until the vegetables are very tender, 18 to 20 minutes.
  3. In a blender, working in batches, puree the soup until smooth, adjusting the consistency with water as necessary. (Alternatively, use a handheld immersion blender in the saucepan.) Top with the Cheddar and bagel chips, if desired, before serving.

Monday, March 7, 2011

Red Enchilada Sauce

Hola!  Last night it was enchiladas on the menu. They were muy delicioso!  I love enchiladas because they are so easy, and so good. It is one of those dishes where it is easy to accomodate the carnivore and me.

I'm not going bore you with the logistics of my enchiladas. I think we all have our favorites.  For the huz I put rotisserie chicken, cheddar cheese, and black beans. For mine I put tofu, cheddar cheese, and black beans.

I will tell you that these have to be the best enchiladas I have made in a long time. I think every time I make them I do a different filling. For my tofu, I actually sliced up a brick, and roasted it in a 350 oven for approximately 40 minutes. I didn't freeze it, thaw it, squeeze it, like some recipes I have seen. Nope. I kept it simple.  I put them in the oven on my Silpat. If you do not know what a Silpat is - you really need one. The Silpat could be it's own blog topic. This tofu was my "chicken" and it worked out perfectly.

Look at those tofu soldiers!
The key to any good enchilada is really the sauce, because really without the sauce, you'd just have a 9 x 13 pan of soft tacos. I have had this enchilada sauce recipe for 10 years. I never buy enchilada sauce because of it. The ingredients are staples that I always have in my pantry. The beauty is that while it simmers I am able to roll my enchiladas, and then cover them with this fantastic red sauce when it's done. It's a win-win.

The other bonus is that while my enchiladas were busy cooking away in the oven, I put together a lovely assortment of vegetables to steam.  The perfect side dish.

Admit it - you know you want some

All that was missing were margaritas....and chips....and deep fried ice cream.  Really nothing was missing, because these were AWESOME!

Red Enchilada Sauce
Makes 3 cups (8 servings)

Ingredients
  • 1 tablespoon olive oil
  • 2 cloves garlic, minced
  • 1 teaspoon minced onion
  • 1/2 teaspoon dried oregano
  • 2 1/2 teaspoons chili powder
  • 1/2 teaspoon dried basil
  • 1/8 teaspoon ground black pepper
  • 1/8 teaspoon salt
  • 1/4 teaspoon ground cumin
  • 1 teaspoon dried parsley
  • 1/4 cup salsa
  • 1 (6 ounce) can tomato sauce
  • 1 1/2 cups water

Directions

  1. Heat the oil in a large saucepan over medium heat. Add the garlic and saute for 1 to 2 minutes. Add the onion, oregano, chili powder, basil, ground black pepper, salt, cumin, parsley, salsa and tomato sauce.
  2. Mix together and then stir in the water. Bring to a boil, reduce heat to low and simmer for 15 to 20 minutes.

The veggie enchiladas have beans on top - sneaky, huh?

Saturday, March 5, 2011

Vegetarian Tortilla Soup

I became a vegetarian toward the end of my college career.  Ironically enough one of the reasons I became vegetarian was because I was addicted to a soup.  When I was in college I worked at a small coffee shop long before there was a Starbucks on every corner. I was a barrista before the word existed.  I loved working in this coffee shop. The owners were like family, the place had history, and people loved going there.
We were a typical coffee shop: coffee, tea, in house baked goods in the morning, soups, salads, and sandwiches in the afternoon. Every day we had two soups on the menu, Vegetarian Vegetable and a daily special. The daily special changed every day, just as the name implied,  and I never knew what wonderful soup would be on the menu  until I came to work that morning.  My kryptonite….Turkey Noodle Soup.
I had to pause for a second there. I’m sure it s like an addict remembering their last fix. This soup was intoxicating. This was no ordinary Turkey Noodle Soup. This was NOT some weak, little chicken noodle soup made with turkey. This was its own being.
Turkey Noodle Soup was a cream based soup, not broth. This was not a cream base that you could stand your spoon in, but a perfectly smooth, coat your spoon kind of base.  The pasta of choice was elbow macaroni.  As the soup simmered throughout the morning, the pasta would plump up, absorbing the creamy deliciousness.  Of course there was cubed turkey, carrots, celery, and fresh parsley, but this soup really had me with the noodles and cream.
I couldn’t resist it. It would call to me all day. Every time I walked by the steam table, I had to have a taste. And then another.  Then a little cup.  Then another spoonful. I could not stop myself when it came to this soup. I gained 10 pounds working in this coffee shop strictly because of this soup.
 I had to do something. What could I do to keep from eating this gift from God?  I knew the only remedy was to stop eating meat. That would be the only way I would not eat this beautiful soup. No meat = No Turkey Noodle Soup. I know it sounds drastic, but when you are faced with an addiction it is never easy. You have to take the first step. The detox was rough, but I white knuckled it. No support group necessary.  I have lived to tell the tale. 
Eventually the owners sold the shop and the new owners turned it into a sushi place, so that was the definitive end of Turkey Noodle Soup for me. I have never seen it since, but its memory lives on.
You are probably wondering what Turkey Noodle Soup has to do with Vegetarian Tortilla Soup.  Since I became a vegetarian roughly 18 years ago a new soup has come to fruition: Chicken Tortilla Soup. Of course I’ve never had Chicken Tortilla Soup, but it has always intrigued me. No, it’s not cream based, and there is no noodle in sight, but the thought of vegetables and beans, simmering in a flavorful broth topped with fried tortilla strips – who doesn’t want some of that?
The Oregonian recently published a Vegetarian Tortilla Soup recipe that I could not wait to try. We had this on Tuesday night.  It is amazing the depth of flavor it achieves in such a short period of time.  I actually let mine simmer for 45 minutes, because I had the time.  I may have a new favorite.  Bring on the chips and salsa!!!

Vegetarian Tortilla Soup
Published January 19, 2010
Makes 4 servings
Ingredients
·       4 6-inch corn tortillas (see note)
·       3 tablespoons vegetable oil
·       3/4 cup chopped onion
·       2 cloves garlic, minced
·       1 tablespoon tomato paste
·       1 teaspoon ground cumin
·       3/4 teaspoon chili powder
·       4 cups canned vegetable broth
·       4 tablespoons chopped fresh cilantro (divided)
·       1 14.5-ounce can diced tomatoes
·       1 15-ounce can black beans, drained and rinsed
·       2/3 cup frozen corn kernels
·       1 1/2 tablespoons minced, seeded jalapeño chile
·       Salt and freshly ground black pepper
·       Garnishes: diced avocado, sour cream, shredded jack cheese or queso fresco, lime wedges, minced green onion
Instructions
If the tortillas are fresh, dry them in a 200-degree oven for about 10 minutes. Cut tortillas in half, then cut the halves crosswise into 1/2-inch-wide strips.
Heat the vegetable oil in a large saucepan set over medium-high heat until hot. In batches, fry the tortilla strips until crispy. Remove with a slotted spoon and drain on paper towels.
If necessary, discard all but a couple teaspoons of the oil. Add the onion and sauté until almost tender, about 5 minutes. Add garlic and sauté 1 minute more. Stir in tomato paste, cumin and chili powder. Add broth and 2 tablespoons cilantro and bring to a boil. Reduce heat; cover and simmer 15 minutes.
Add tomatoes, beans, corn and jalapeño to the soup. Cover and simmer until ingredients are heated through. Season to taste with salt and pepper. Divide half of the tortilla strips among the bowls. Ladle soup on top and sprinkle with the remaining cilantro and tortilla strips. Serve, letting guests embellish their own soups with the garnishes.
Note: If you like, you can skip the tortilla-frying step and just use a few cups of broken tortilla chips instead.
PER SERVING (without garnishes): calories: 330 (31% from fat); protein: 4.4 grams; total fat: 11.5 grams; saturated fat: 1 gram; cholesterol: 0; sodium: 984 mg; carbohydrate: 53.2 grams; dietary fiber: 13.8 grams
Adapted from Bon Appétit

Monday, February 28, 2011

And the Oscar goes to...

Last night we watched the Oscars and enjoyed homemade pizza, garden salad with shrimp, and mounds of freshly washed laundry.  It was a good time.
I have to admit there is something comforting about being in your coziest sweats, fire in the fireplace, the house smelling like pizza, and watching those poor famous people all gussied up in their stiff jackets and gowns with painfully high heels having to sit in a theater for three plus hours watching what I felt was a pretty mediocre broadcast. I love being able to walk in and out of the room, grab a slice, get online for a bit, and put away some laundry, all in my slippers no less.  I’m so thankful I’m not rich or famous.
I didn’t snap any photos last night – I was really trying to avoid the paparazzi – but I did want to share this pizza dough recipe. I have experimented with many recipes, and this one has to be my favorite so far.  This would definitely get the Oscar for “Best Performance by a Quick Rising Yeast.” Delish!
Oscar Winning Pizza Dough
Parade Magazine April 25, 2010
Yields enough dough for two 14-inch pizza

3 ½ to 4 cups bread flour, plus more if needed ***
1 teaspoon sugar
1 envelope instant dry yeast
2 teaspoons kosher salt
1 ½ cups warm water (110 degrees)
2 tablespoons plus 2 teaspoons olive oil
  1. Combine 3 ½ cups flour, sugar, yeast, and salt in a food processor and pulse to combine.
  2. While processing, add the water and 2 tablespoons of oil until the dough forms a ball.  If the dough is sticky, add 1 tablespoon of flour at a time and continue processing until it comes together into a solid ball.
  3. Scrape dough onto a lightly floured surface and gently knead until smooth. Form into a smooth ball.
  4. Grease a large bowl with the remaining olive oil, add dough, cover with plastic wrap, place in a warm area, and let rise until double in size – about 1 hour.
  5. Turn the dough onto a lightly floured surface and divide into two equal pieces. Cover each with a clean kitchen towel and let rest for 10 minutes.

***Note: bread flour will give you a crispier crust. If you use all-purpose flour (which I did) it will give you a chewier crust.

Saturday, February 26, 2011

Camarones Enchilados

I have a terrible addiction. Part of my starting this blog was to help me with this problem. It was beginning to take over and I needed to get it under control.  My name is Shawn, and I hoard recipes.  Nothing brings me greeter joy than thumbing through a magazine, or newspaper, and finding a great recipe to try.  I play the recipe through my head. I plan little scenarios for them. This would be great on a warm evening, out on the patio.  This would be great when we have people over to watch a football game.  This would be perfect with some steamed kale, or collard greens. Oh the possibilities of a new recipe! 
I really thought I had it under control because I was “organized” about it. And really, who doesn’t need a new recipe from time-to-time? Cooking is a daily chore, and recipes keep it interesting.
The ritual would go like this.   First I would sit down with a magazine, casually flip through the issue, and dog tag any pages that seemed promising. The second time I would go through the magazine I would spend time reviewing my dog tagged pages to see if they were really  worth keeping (could I come up with a feasible enough scenario).  If they were, then I would carefully remove the page and place it in a binder. Yes, a nice three-ring binder.  I have page protectors and everything.
As I began to fill my binder I realized I really needed to classify these recipes in some way.  I mean what’s the use in saving something if you can’t find it when you need it? So I created tabs –Soup, Salads, Vegetarian Entrees, Asian, Mexican – you get the gist.  Here in lies the problem. I began saving so many recipes that one of two things began to happen:  (1) I would throw the recipe into the front of the binder - no page protector, no classification, no nothing, or (2) I began finding magazine pages randomly placed throughout my house, more often than not dispersed amongst my piles of magazines or in my “things I’ll get to someday” pile. The problem was I wasn’t getting to them, nor did I even know that I had them.
This is not what organization should look like
Now I have heard of people who have a rule that if they have not worn something in a year, they need to get rid of it. I began to think this was the approach I needed to take with my recipes. If I haven’t used it, it’s out of there. Or better yet, if I find a new recipe I really want to keep (and plan to cook in the next year), then one of the old recipes has to go (this rule I actually do follow when I buy something new – out with the old, in with the new).
Which brings us to Wednesday night: Camarones Enchilados. I have had this recipe since May 2010 and have never made it. Man am I glad that I finally got around to it. It is so darn good.  This is not your typical enchilada recipe, hence the "enchilado" name.  I would call it a deconstructed enchilada.  You create this beautiful, flavorful red sauce (crushed tomatoes, capers, red wine, garlic), then add fat, juicy shrimp, with a hit of fresh lime at the end.   Wrapped in warm flour tortillas with cilantro and queso fresco – they are like a messy soft taco.  And don't even get me started on queso fresco. I will be using this cheese in place of feta any old day. You will so thank me for this recipe, or actually Real Simple magazine. My mouth is watering just thinking about it. 
One last note, the huz wanted me to let you know that the clean up for this dinner was a snap. He said it was the easiest clean up he has had all weeek.  I love this guy.
Camarones Enchilados
Serves 4| Hands-On Time: 25m | Total Time: 55m
Real Simple Magazine May 2010 - By Alejandra Ramos

Directions

  1. Heat the oil in a Dutch oven or large saucepan over medium-high heat. Add the onion and bell pepper and cook, stirring occasionally, until they begin to soften, 3 to 5 minutes. Add the garlic, paprika, crushed red pepper, and ½ teaspoon salt and cook, stirring, until fragrant, 1 to 2 minutes.
  2. Add the cilantro, wine, capers, and tomatoes, crushing them with your hands as you add them. Bring to a boil. Reduce heat and simmer, stirring occasionally, until the liquid is slightly thickened, 15 to 20 minutes.
  3. Messy is good!
  4. Add the shrimp and lime juice to the tomato mixture and cook until the shrimp are opaque throughout, 3 to 5 minutes. Serve with the tortillas, avocado, hot sauce, queso fresco, cilantro, and lime wedges, if desired.

Friday, February 25, 2011

Easy "Sausage" Bake

One way to soothe the carnivore beast
Tuesday night I made Easy “Sausage” Bake, a recipe I have had since 1998. Yes, I’m pretty old.
Don’t let the name fool you though. It is a vegetarian recipe (notice the “sausage” in typed air quotes?). I love this recipe because it is super easy to make (hence the name) – and it is hearty and yummy, especially on a chilly evening.  I promise this dish will please even the most bacon-cheesy-burger loving carnivore you know.  I know mine loves it.
The key to the simplicity of this recipe is using a lidded saute pan. Mine is a 3 qt. beauty that I picked up from Target a few years ago. It wears like iron, can go from stovetop to oven, and cleans like a dream.  If you do not have a pan like this, put it on your 2011 Christmas Wish List. You will get so much mileage from it.
I put the "ease" in easy

Easy “Sausage” Bake
Makes 6 servings

1 tablespoon olive oil
1 large onion chopped (red, yellow, or what the heck even a white onion will do)
1 large green bell pepper, chopped
4 Tofurky Italian Sausages, cut into 1/2” slices
1 ½ cups Arborio rice (risotto)
2 cups vegetable broth, boiling
1 cup spaghetti sauce
½ cup grated Parmesan Cheese or Three Cheese Blend
1.       Preheat oven to 350
2.       Heat oil in a large saute pan over medium heat. Add sausage and saute three minutes.
3.       Add onions and peppers, and saute an additional 5 minutes until vegetables are tender and sausage is browned.
4.       Add rice, broth, spaghetti sauce, and stir to combine. Add half the cheese, stir, and place the lid on saute pan.
5.       Bake in the 350 oven 30 minutes or until liquid is absorbed. Uncover, stir, and sprinkle with remaining cheese. Bake uncovered an additional 10 minutes. Done. Easy.
     Served with a side of steamed broccoli and collard greens (the other half of the bunch from Monday night’s dinner) and you have a great dinner on your hands, or plate J